Prusa Mendel/es
|
English • العربية • български • català • čeština • Deutsch • Ελληνικά • español • فارسی • français • hrvatski • magyar • italiano • română • 日本語 • 한국어 • lietuvių • Nederlands • norsk • polski • português • русский • Türkçe • українська • 中文(中国大陆) • 中文(台灣) • עברית • azərbaycanca • |
Estado: Funcionando
| Descripción | Prusa Mendel es una versión simplificada de una Mendel. |
| Licencia | GPL |
| Autor | Prusajr (diseño), Kliment (mantenimiento y documentación), Spacexula (documentación), GregFrost (ideas, refactoring) |
| Basado en | Mendel |
| Categorías | |
| Modelo(s) CAD | File:Prusa Mendel.EASM |
| Enlaces externos | nada |
- Si está construyendo esta máquina usando el sistema métrico inglés / Americano (o SAE imperial), véase también SAE Prusa Mendel.
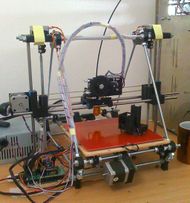
Prusa Mendel es el Fort T de las impresoras 3D.
Al igual que el Modelo T, la Mendel Prusa mejora el diseño anterior al ser más ágil para la fabricación. La Mendel Prusa es un remix simplificado del original Mendel. Por defecto, se utilizan casquillos impresos en lugar de rodamientos normales, aunque las opciones para sustituirlos por cojinetes baratos lm8uu o de otro tipos de cojinetes o bujes están disponibles. La versión actual utiliza en total tres cojinetes de 608, uno para el eje X y dos para el eje Y. Los rodamientos de 624 ya no son utilizados.
El objetivo principal de Prusa es ser la impresora 3D más sencilla que usted pueda construir.
- Es mucho más simple de construir.
- Es mucho más simple de modificar.
- Es mucho más simple de utilizar.
- Es mucho más simple de reparar.
Debido a su complejidad, Prusa Mendel es un proyecto vivo en continua actualización. Esto, que es una característica única, debería ser la norma.
Contents
<videoflash>tyVM3-v84I0</videoflash>
Desarrollo
El desarrollo de Prusa Mendel está alojado en github: http://github.com/prusajr/PrusaMendel.
Puede seguir los cambios en Changelog.
También puede darse de alta gratuitamente en github y participar en el proyecto.
Historia
Lista de Materiales
Partes Imprimibles
| Cantidad | Descripción | Tipo | Comentarios | Diagrama |
|---|---|---|---|---|
| 2 | Acoplamientos | RP | | |
| 3 | Soportes para final de carrera | RP | | |
| 1 | Carro X | RP | | |
| 1 | Fin eje X | RP | | |
| 1 | Fin eje X con motor | RP | | |
| 1 | Soporte motor Y | RP | | |
| 2 | Soportes motor Z | RP | | |
| 4 | Abrazaderas de la correa | RP | | |
| 8 | Abrazaderas de barras | RP | | |
| 2 | Soportes de barras | RP | | |
| 2 | Engranaje para motor | RP | | |
| 4 | Vértices del bastidor con pié | RP | | |
| 2 | Vértices del bastidor | RP | | |
| 12 | Cojinetes | RP-PLA | Chequee su fichero de construcción, el fichero puede crear entre 4 y 12 | |
Partes No Imprimibles("vitaminas")
Tenga en cuenta que las partes adicionales son necesarias para la extrusora, aunque algunas partes de la misma se incluyen en la tabla de abajo.
| Cantidad | Descripción | Tipo | Comentarios |
|---|---|---|---|
| 83 | M8 tuercas | Cierre | Compre un paquete de 100 para estar seguro. |
| 93 | M8 arandelas | Cierre | Compre un paquete de 100 para estar seguro. |
| 6 | M8×30 arandelas | Cierre | Usadas como guía de las correas. |
| 2 | M4×20 tornillos | Cierre | Para montar la extrusora |
| 2 | M4 tuercas | Cierre | Para montar la extrusora |
| 2 | M4 arandelas | Cierre | Para montar la extrusora |
| 22 | M3×10 tornillos | Cierre | |
| 16 | M3×25 tornillos | Cierre | U ocho M3 x 25 tornillos, además de ocho tornillos M3x20. Los tornillos M3x25 son demasiado largos para la el reciente soporte del motor z de Prusa, las pinzas de la barra y también para los acoplamientos del motor Z. Vea la Sección 8, los pasos 4 y 13 para más detalles. |
| 4 | M3×40 tornillos | Cierre | |
| 70 | M3 arandelas | Cierre | |
| 40 | M3 tuercas | Cierre | Opcionalmente 8 tuercas de seguridad / autoblocantes / nyloc |
| 2 | M3 grub screw / set screw | Fastener | M3x8 parece ser el ideal pero cualquiera de 6mm o más largo debería valer. Si son difíciles de conseguir, también se podría trabajar con pernos adicionales de M3x10. |
| 3 | 608 rodamiento | Rodamientos | |
| 4 | Muelles de bolígrafos | Muelles | Para ajustar los tornillos M3. Los bolígrafos son una fuente común y barata de muelles adecuados. Con cerca de 25 mm de largo y 10 mm comprimidos. |
| 6 | M8×370mm | Varilla roscada | 3 por cada lado. Nota: Las varillas roscadas se pueden adquirir en trozos 6x1m (véase el auto roscado Corte barra más abajo). |
| 4 | M8×294mm | Varilla roscada | frontal / trasera. |
| 3 | M8×440mm | Varilla roscada | parte superior / inferior. |
| 2 | M8×210mm | Varilla roscada | Sistema de subida / bajada del eje Z |
| 1 | M8×50mm | Varilla roscada | o tornillo M8x30 o mayor para la polea del eje X. Take care: if the bolt is too long, it may not be threaded along a sufficient length |
| 2 | 8mm×420mm | Varilla lisa | Barra X Nota: Se recomiendan de Acero inoxidable 304 o Acero A2 para las barras lisas, ya que puede ayudar a prevenir la fricción contra el óxido, además de fábrica vienen con una menor desviación. Los problemas de oxidación se puede prevenir en las barras de acero normal, manteniendo una capa de aceite. Las barras lisas también se pueden cortar en trozos más grandes de 3x1m (ver Orden de corte lisos barra más abajo). |
| 2 | 8mm×406mm | Varilla lisa | Barra Y |
| 2 | 8mm×350mm | Varilla lisa | Barra Z |
| 1 | 225mm×225mm print top plate | Thick Sheet | |
| 1 | 140mm×225mm Plataforma inferior de impresión | Thick Sheet | |
| 1 | 840mm×5mm T5 correa de trasmisión | Correas | Eje Y |
| 1 | 900mm×5mm T5 correa de trasmisión | Correas | Eje X |
| 5 | NEMA 17 bipolar stepper motor | Stepper | Be sure to get ones with at least 20mm of shaft length. Shorter shafts require modifications to the X pulley assembly and Z motor couplers. One of the five motors, for use with the extruder, should be capable of creating a holding torque of at least 40Ncm, at the very least. |
| 50 | small cable binder / ziptie | Misc | |
| 1 | Wade's Geared Extruder | for 1.75mm filament RepRap Universal Mini Extruder; or any other compatible extruder for either | |
| 1 | Electronics + endstops | This can be RAMPS, Sanguinololu, Gen6, Gen7, Gen3, or any other Mendel compatible electronics. Endstops are either optical switches or microswitches (Recommended), and you need three, one for each of the X, Y, Z axes. |
| Cantidad | Descripción | Tipo | Comentarios |
|---|---|---|---|
| 3 | 30mm×10mm Optoflags | Thin Sheet | Si se van a usar finales de carrera ópticos |
| 2 | 8mm ID spring | Spring | to eliminate backlash in the z axis |
| 1 | objeto con exactamente una longitud de 290mm | para alineación del marco | |
| 1 | objeto con exactamente una longitud de 234mm | para alineación del marco |
Nota: Se pueden combinar los dos últimos objetos teniendo una pieza de thick sheet con las dimensiones 290mm×234mm. Hay que asegurarse de marcar qué lado es cada uno.
Threaded Rod Cut Order (when cutting from 1m lengths):
 Required: 6x1m Long 8mm Threaded Rods (or 5x1m pieces + 1x50cm piece)

 Rod 1: 370mm, 370mm, 210mm, ~50mm (The last piece will end up somewhat shorter than 50mm. )
 Rod 2: 370mm, 370mm, 210mm, ~50mm ( Use it for your idler. Alternatively, an M8x30 or     )
 Rod 3: 370mm, 294mm, 294mm, ~42mm ( longer bolt can be used.                              )
 Rod 4: 370mm, 294mm, 294mm, ~42mm
 Rod 5: 440mm, 440mm, ~120mm
 Rod 6: 440mm
Smooth Rod Cut Order (when cutting from 1m lengths):
 Required: 3x1m Long 8mm Smooth Stainless Steel Rod

 Rod 1: 420mm, 420mm
 Rod 2: 406mm, 406mm
 Rod 3: 350mm, 350mm
The Prusa Mendel uses the 4 drivers in the standard Mendel electronics package to drive 5 motors by using two steppers wired in parallel to one driver [1].
Where To Purchase
See the Mendel Buyers Guide for information on where to purchase all of the parts needed.
Printing the Parts

Printing a Prusa on a Mendel
The pre-assembled build file is an easier option for printing Prusa parts from a RepRap Mendel. With this option you only need to print mendelplate.stl and pla-bushing.stl to get a complete set of printed parts for the Prusa Mendel:
- Mendel Plate (contains all printed parts except the PLA Bushings)
- PLA Bushing
Printing a Prusa on a CupCake CNC
There are also pre-assembled build files available to fit your CupCake CNC's build area (download using right click => save as)
Note:
- These plates are 85x95mm in size.
Plates for the MakerBot (the plates have changed, these print times are no longer accurate):
- Makerbot Plate 1=> 6 hrs 30 min
- Makerbot Plate 2=> ~2 hrs 30 min (needs retesting)
- Makerbot Plate 3=> 5 hrs 40 min
- Makerbot Plate 4=> 2 hrs 30 min
- Makerbot Plate 5 => 1 hr 50 min
Printing a Prusa on anything else
Last but not least, if you have a machine that doesn't fit into any of the previous options all the .stl files necessary to print a Prusa Mendel are available on the PrusaMendel Github where you can download them and print them individually.
Buy the printed parts
Mendel_Buyers_Guide#RepRapped_Parts_Kits
Assembly
- Assembly instructions >> Prusa Mendel Assembly.
- Required Tools
Media
- Two printers simultaneously - Prusa and shaper cube working side by side.
- Prusa homing using endstops
- Prusa development overview
- Prusa Y axis stress test
- Prusa Z axis stress test
- Early preview of the Prusa Mendel redesign
- Fumon's Prusa build session 1 - D1plo1d building Fumon's Prusa Mendel at Hacklab.to. Should give a hint as to how the Prusa Mendel parts go together.
Prusa Improvements/Hacks
- Rob's Auto-centering shaft coupler - designed to reduce shaft/motor vibrations (print 2/replaces 2x coupler). May require widening the openings on the z motor mounts to allow the rotation of the zip tie. Use a zip tie gun to get maximum compression on the coupling.
See Also
External Links
- Prusa's Blog
- Prusa Builder Blog Feed
- Assembly photo gallery
- Prusa Mendel Visual Instructions - A nicely formatted version of the assembly process in PDF.
- Paperback version the Prusa Mendel Visual Instructions, also available in color.
- Prusa Mendel Assembly Video Tutorial This video, the first of a series, provides an overview.