Air 2
|
[[::Air 2|English]] • [[::Air 2/es|español]] • [[::Air 2/fr|français]] • [[::Air 2/de|Deutsch]] • [[::Air 2/zh_cn|中文(中国大陆)]] • |
Release status: working

| Description | Simplified Prusa
|
| License | GPL
|
| Author | |
| Contributors | |
| Based-on | |
| Categories | |
| CAD Models | |
| External Link |
Contents
NOTE
This page illustrates how to mount the Air 2 (by Mecano) using the parts developed (by Prusa) for the Prusa i2. Linear bearings are used for the Y Axis and T2.5 belts and aluminium pulleys for the motion transmission.
Introduction by - Mecano
Since I discovered the RepRap project I was surprised by the sheer amount of knowledge that could be stored (and organised) by an on-line community of aficionados. I was most impressed to see so ground shaking an invention take root and grow through the collaboration of specialists dispersed all around the world from varied fields such as mechanics, electronics & computers facilitated by this incredible network.
Josef Prusa revolutionised the mechanical design of this device when he dramatically simplified the construction of the RepRap Mendel. The result of his efforts, the Prusa, has become a standard in RepRap building. This achievement also made it much easier for any person to build a 3D printer (provided they are prepared to a little reading and learning along the way).
The "Air" drinks from this spirit and attempts to add a new twist to the construction of a 3D printer.
The design is based on three basic principles:
1) Simplification of the assembly process(KISS principle).
2) Designing the parts in the cheapest way but still meet the requirements.
3) Improving the aesthetics by introducing a little elegance and beauty to the finished item.
Within these guidelines, the use of RP parts has been reduced for "commercial" pieces but nonetheless bearing in mind that they are readily available worldwide so any anyone can use them if they so wish.
Specifications
- Printed Parts: See below
- Non-Printed Parts: See below
- Printing Size: 190x180x100
- Material Cost: Around 500 Eur.
- Cost: Around 800 Eur
- Precision: Same as Prusa.
- Speed: Succeeded printings at 70 mm/sec printing and 120 mm/sec travelling.
Air Frame Replacement
A) Most of the frame rods and RP pieces have been replaced by "four pieces of 6mm acrylic". These are dimensioned following the exact dimensions of the original Prusa design. So for all intents and purposes this machine works as a Prusa with all sizing, trips, electronics, firmware etc. of a Prusa.


B) When viewed from the side, one of the sides of the typical Mendel triangle has been removed, resulting in a more accessible work area.
C) The holes for the rods have been changed (slotted) so that the rods can be removed without having to completely unscrew the nuts.

D) With the Y axis you can choose to use a traditional Y-axis or mount a variation on the theme: Y-axis with integrated heated platform as shown in thingiverse.
The X and Z axis have not changed, they are exactly the same as that of a Mendel Prusa.

Improvements of Air 2 frame regarding Air 1
Increased Print Volume
The available volume for printing was increased through:
- Lateral separation - (from 234mm to 250 mm)
- Lowering of the heated print bed - down by 10mm
These small (but nonetheless significant) changes resulted in a total available print cube of 190mm X 190mm X 100mm. Naturally, the actual exact volume available for printing will ultimately depend on the height of your heated bed and the lowermost point of your Hot End.
Improved Rigidity
- The transparent acrylic material for the frame was increased in thickness to 6mm.
- A cross "bearer" was introduced to define the frame thereby increasing rigidity and removing possible inaccuracies in setting the horizontal separation between the vertical supports.
- Washers(DIN9021)introduced at the fixing points between rods and the Acrylic frame.
Desing made considering the wiring:
Design improved with a view to neatening up the cabling.
- Control electronics is expected to go on the left hand side (board horizontally oriented to receive cabling from above)
- Acrylic supports had holes introduced to allow cabling to be "loomed" through.
Images of current design:


Angle brackets for assembly:
The brackets used to fix the horizontal motor support to the new back "bearer" were purchased at the local hardware store. However these could easily be made out of ABS. The design to be printed can be found at http://www.thingiverse.com/download:46665

Bill Of Materials
Here are all the parts needed to build the printer.
Printed Parts
Frame and Structure
| Piece | stl file | Description | Quantity | Comment
|
|---|---|---|---|---|
 |
stl | GliderStop | 2 | Used to fix the z smooth rod to the the acrylic frame |
 |
stl | Squad | 3 | Used to fix the acrylic frame |
 |
stl | U-clamp | 6 | Clamps used to pin smooth bars to threaded rod |
 |
stl | Belt Clamp | 4 | Clamps to close the belt loops |
 |
stl | Belt Clamp | 2 | Belt Clamp nut Holder. |
 |
stl | Endstop Holder | 3 | Support for endstop |
 |
stl | X End Idler | 1 | X-Axis idler - opposite end of motor support. (Jonas Kuehling): http://www.thingiverse.com/thing:18384 . Prusa i2 does not work because the holes for the rods are blind. |
 |
stl | X End Motor | 1 | X-Axis motor support. (Jonas Kuehling): http://www.thingiverse.com/thing:18384 . Prusa i2 does not work because the holes for the rods are blind. |
 |
stl | Y Motor Bracket | 1 | Y-Axis motor bracket |
 |
stl | Z couplings | 2 | |
 |
stl | LM8UU X carriage. | 1 | See Note below Reinforced Alternative (Jonas Kuehling): http://www.thingiverse.com/thing:18657 |
 |
stl | Y Bushing | 4 | Bushings for holding the lm8uu linear bearings - Reinforced Alternative (Jonas Kuehling): http://www.thingiverse.com/download:53948 |
Note: Instead of using the printed support for the heated bed Mecano has developed for the Prusa Air the following part: http://www.thingiverse.com/thing:11657
Extruder (by Jonas Kuehling)
It can be found here http://www.thingiverse.com/thing:18379
Rods and screws
Threaded rods
The threaded rods can be be steel(zinc plated) or stainless.
Diameter M8
Lengths required are: 4 x 285 mm 2 x 210 mm 1 x 430 mm
If you cut them from 1 meter rods you will need two rods The best way to cut these is:
Rod 1: 285 - 285 - 430 ========> Total 1000 mm
Rod 2: 285 - 285 - 210 - 210 ===> Total 990 mm
Smooth Rods
The smooth rods should be stainless steel.
Diameter M8
Ideally you should use calibrated rounds. These have very tight dimensional tolerances (7.97 - 8 mm)
Lengths required are: 4 x 410 mm 2 x 345 mm
The total legth would be about 2.35 m. The dimensions may be the same as those of Prusa but some have been slightly changed to minimize the number of different pieces.
Screws
Again I stress that this includes the hardware necessary for the printer without including the extruder / X carriage or Y axis platform pieces.
| Quantity | Set | DIN | For: |
|---|---|---|---|
| 43 | M8 nuts | DIN934 | For rods |
| 40 | M8 washers | DIN125 | For rods |
| 1 | M8x35 screw | DIN933 | Axis belt X carriage |
| 8 | M3x10 screws with nut | DIN912 | To fix X-Axis guides |
| 16 | M3x10 with washer | DIN912 | To fix the 4 motors |
| 7 | M3x20 screws with nut and double washer | DIN912 | Z couplings and Endstop Holders |
Screws DIN 912 are Allen type which makes installation much easier.
Finally you will need to add:
3 x 608ZZ bearings ( + 3 for the extruder)
Belts T2.5 840 and 900 mm long and 5 mm wide and T2.5 pulleys
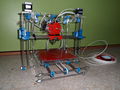
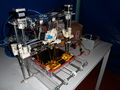
Building Photographs


They made one

La Cosa by Veimox

Gandalf the White by avalero

Gandalf the White by avalero

Wendy by Nicuma
Wendy by Nicuma
Marvin by Maik


